Learning Objectives:
• To learn how noses are typically proportioned.
• To practice skills in proportions, tonal shading and detail.
• To improve your ability to see shapes, tones and gradients accurately
• To make appropriate changes to improve your work as it develops.
• To practice skills in proportions, tonal shading and detail.
• To improve your ability to see shapes, tones and gradients accurately
• To make appropriate changes to improve your work as it develops.
Your task:
Produce a detailed drawing of a nose that is approximately 8cm high, following the video, worksheet and tips below. You should be routinely making changes as your work develops.
What you will need:
Sketching paper (or your sketchbook), a soft pencil (preferably 2B or 4B), eraser, blending stump (or cotton bud) and a pencil sharpener.
For beginners:
If you are still working on your tonal shading skills, begin by having a go at drawing this nose (without the annotations):
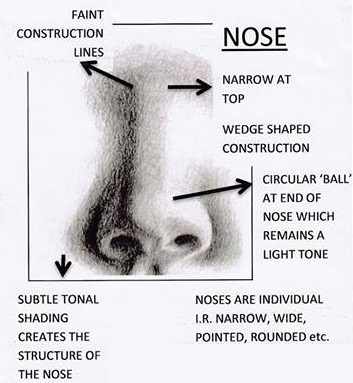
Understand how a nose is structured:
Stretch & Challenge:
Once you are ready to challenge yourself, follow this tutorial and the accompanying video to produce a more realistic, unique nose.
Top Tips:
• Check the width and angle of each shape carefully
• Try not to simplify each shape. Look for every irregularity in the outlines
• Try not to simplify each shape. Look for every irregularity in the outlines
Other Tips:
• Use a sharp pencil
• Draw as lightly as you can when sketching your initial outlines
• Measure the initial width, height and angle of each shape carefully
• Hold your pencil as a shallow angle when shading to avoid scribble lines appearing
• Layer up your shading gradually and smudge between each layer
• For the lightest areas of shading (e.g. the skin), it is better to apply graphite using a cotton bud or a piece of tissue, rather than using your pencil as pencils can make it too dark and 'scratchy'
• Place a piece of scrap paper under your wrist to prevent unwanted smudges
• If your highlights become too dark, you can use a kneadable eraser/putty rubber (or a piece of white tac) to dab the page. This will lighten your work without erasing it completely